


[분석환경]
Windows 10 x64
실습 바이너리 : x86[분석도구]
Frida 15.1
Frida-Trace
어떤 API 호출을 하는지 확실하게 보고 싶을 때 Frida-Trace의 도움을 받을 수 있다.
frida-trace -i “*send” [실행경로]
프로그램이 동작하면서 일치하는 이름의 함수가 호출될 때 로그로 남겨주고 일치하는 함수가 존재하여 후킹되었을 경우 frida를 실행한 경로 내에 handler 폴더 내에 후킹을 위한 스크립트를 자동으로 생성해준다.

Hooking
Frida로 함수의 인수 값을 출력하려면 frida Interceptor API를 사용한다. Interceptor는 onEnter와 onLeave로 정의한다. onEnter는 후킹 대상이 되는 함수의 실행 직전에 실행되며, onLeave는 함수 실행이 완료될 때 호출된다.
windows 후킹을 위해서는 Windows API에서 메소드 명을 가져와야 한다.
var hooksend = Module.getExportByName("WS2_32.dll", "send");
Interceptor.attach(hooksend, {
  onEnter(args) {
    console.log("size : " + args[2].toString());
    console.log("Buffer Dump : \\n" + hexdump(args[1]));
  },

  onLeave(result) {
  }
});
특정 함수를 후킹하는 데 사용되는 Interceptor.attach 함수를 호출한 다음 첫 번째 인자로 후킹할 함수의 주소를 전달한다. 이 경우 dll 내 함수를 후킹할 예정이므로 getExportByName 메소드를 이용하여 주소를 구한다.
send 함수가 위치한 WS2_32.dll을 getExportByName 첫 번째 인자로 주고 메소드 명을 두 번째 인자로 준다.
그 다음 onEnter 함수를 정의한다. 핸들러에 전달된 args라는 파라미터는 함수 인수에 대한 포인터를 포함하여 NativePointer 개체로 전달되어 메모리의 위치에 쉽게 접근할 수있고 해당 위치를 다른 형식으로 변환하는 함수를 포함한다.
send 함수의 인자는 onEnter의 “args”에 배열로 담겨 있다.
두 번째 인자에 전송할 데이터가 담겨 있으므로 args[1]번지에 값을 hexdump로 출력한다.
세 번째 인자(args[2])에 send 할 데이터의 길이에 대한 출력을 기대할 수 있다.
frida -l send.js -f Project2.exe
프리다 실행을 위해 스크립트를 로드하는 -l 옵션, 기존 프로세스에 Attach 하려면 -p 옵션과 [pid]를 주면 된다.
일시 중지 없이 프로그램을 계속 실행하려면 —no-pause 옵션으로 실행한다.
frida -p [pid] -l send.js

변조
send API가 사용하는 파라미터를 확인 및 출력하였다. 이제 파라미터의 변조를 시도한다.
파라미터값의 변조는 메모리 내 퍼저 구현 등에 사용될 수 있다.
먼저, 프로세스로 실행중인 메모리에 대한 직접 접근 및 수정은 금지되어 있기 때문에 별도의 메모리 공간을 할당하고 문자열을 메모리에 저장한다. 이러한 기능들은 frida에서 기본으로 제공하고 있으며, 한 줄의 코드 작성으로 할당할 수 있다.
var strPtr = Memory.allocUtf8String("Sample String")
이 코드는 프로그램 메모리에 공간을 할당하고 문자열을 할당된 메모리에 저장하고 문자열을 참조하는 NativePointer 객체를 반환한다.
args[1](전송할 문자열), args[2](전송할 문자열 길이)를 변조하기 위해서 별도로 할당한 메모리로 값을 변조한다.
//"use strict";
var hookAddr = Module.getExportByName("WS2_32.dll", "send");
console.log("[-] Send Address: " + hookAddr.toString());
var strPtr = Memory.allocUtf8String("Modified Message!!");
Interceptor.attach(hookAddr, {
onEnter(args) {
this.sock = args[0];
this.buf = args[1];
this.size = args[2];
this.flag = args[3];
//console.log("size : " + this.size);
//console.log("Buffer Dump : \\n" + hexdump(args[1]));
args[1] = strPtr;
args[2] = ptr(Memory.readCString(strPtr).length);
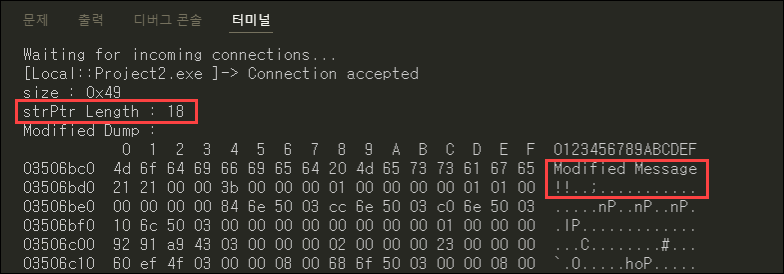
console.log("strPtr Length : "+ Memory.readCString(strPtr).length);
console.log("Modified Dump : \\n" + hexdump(strPtr));
},
onLeave(result) {
}
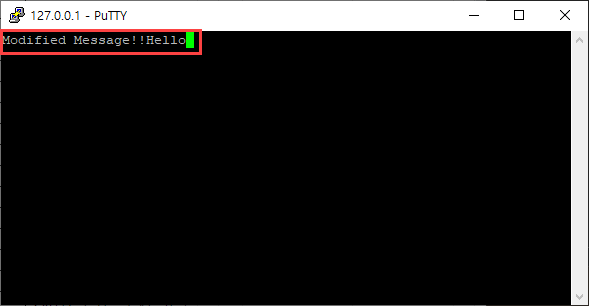
});frida 스크립트 실행 시 변조된 인자로 프로그램이 실행되는 것을 확인할 수 있다.
프로그램 실행 및 localhost 연결 시 변조된 메시지가 수신된다.

호출
NativeFunction 메소드를 이용하면 새로운 함수를 구성할 수 있고 호출도 가능하다.
사용법은 다음과 같다.
NativeFunction(address, returnType, argTypes\[, abi\])
"use strict";
var hookAddr = Module.getExportByName("WS2_32.dll", "send");
console.log("[-] Send Address: " + hookAddr.toString());

//NativeFunction(address, returnType, argTypes[, abi])
var sendCall = new NativeFunction(hookAddr, 'uint32', ['pointer', 'pointer' ,'uint32', 'uint32'])

var strPtr = Memory.allocUtf8String("Modified Message!!");

Interceptor.attach(hookAddr, {
  onEnter(args) {

    this.sock = args[0];
    this.buf = args[1];
    this.size = args[2];
    this.flag = args[3];

    console.log("size : " + this.size);
    //console.log("Buffer Dump : \\n" + hexdump(args[1]));

    args[1] = strPtr;
    //args[1].writePointer(strPtr);
    console.log("strPtr Length : "+ Memory.readCString(strPtr).length);
    args[2] = ptr(Memory.readCString(strPtr).length);
    console.log("Modified Dump : \\n" + hexdump(strPtr));
  },

  onLeave(result) {
    var sock = this.sock;
    var buf = this.buf;
    sendCall(sock, buf, 5, 1);
  }
});
포인터를 이용하여 새로운 send 함수를 생성하고, 인자와 반환 값의 형식을 알맞게 입력한다.
Modified Message!! 뒤에 기존 문자열의 5번째 글자까지 출력된 “Hello” 가 이어서 전송된 것을 확인할 수 있다.
'Reversing' 카테고리의 다른 글
| [Fuzzing 101] 퍼징으로 1-day 취약점 분석하기 (0) | 2022.07.12 |
|---|---|
| [Cheat Engine] 상용프로그램 후킹하기1 (1) | 2022.05.31 |
| [Cheat Engine] Socket Program 분석 (0) | 2022.05.21 |
| [C++] Windows Socket Programming 예제 2 (0) | 2022.05.18 |
| [C++] Windows Socket Programming 예제 (0) | 2022.05.13 |